Why you should localize your app’s listing page creatives
App Store Optimization (ASO)
October 13, 2022

Localization is often an underrated tool of App Store Optimization. However, making sure that your listing page is easily accessible and understandable for every potential user is a necessity. Of course, before starting to localize and translate your app’s listing pages assets, you should ensure that your app is also localized and can offer the best experience to your international audience after they download it.
What exactly is localization?
App localization, here more specifically store localization, is the action of translating and adjusting the metadata of an app’s product page to match a target audience’s language. It includes the app name, title, subtitle, description, preview video, screenshots, icon, and keywords.
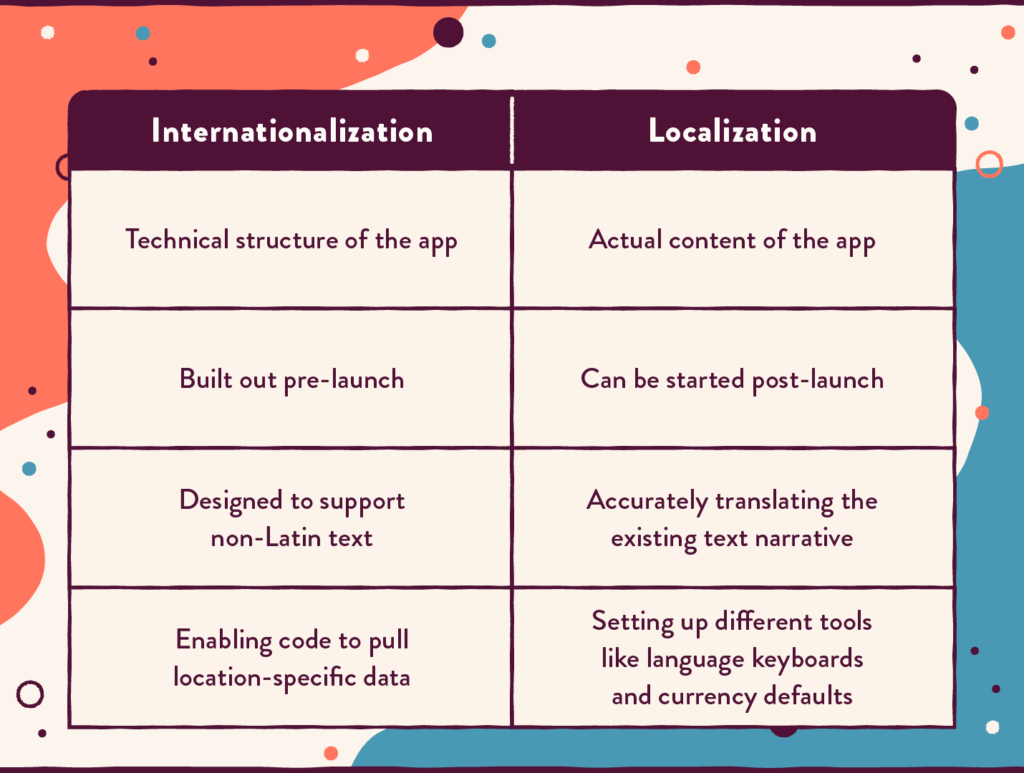
Localization can be applied to both the app in itself (translating and adapting the content inside of it) and its ASO products. When adapting an app to a target language, there are two steps to be aware of: internationalization and localization.
Internationalization happens during the building stage of the app, it’s a way to ensure that your app can support different texts and alphabets (like non-Latin languages) and that the translation can happen on a technical level. After that, localization is the translation, adaptation, and implementation of the actual content of the app.
The App Store and the Play Store are available in over 150 countries worldwide (155 for Apple and 152 for its Google counterpart). They each support a variety of languages, 40 for the App Store and 80 for the Play Store. This means a lot of potential customers and a good market share.
Localization vs. Culturalization
Localizing an app’s assets isn’t just about translating textual elements (even the text that appears on your visuals like screenshots, icons, and preview or promo videos). For your localization to be efficient, you need to take cultural elements into account.
Indeed, some things can have different meanings depending on the context and the culture in which they’re seen. Some symbols or gestures could have a great impact in one of your target regions but be considered offensive in another.
You should aim to provide a consistent experience across your different target markets, so users can easily identify your brand. Making sure that your app image in one country fits perfectly within its culture is an undeniable perk.
Text isn’t the only thing that needs to be adapted and thought through when you’re trying to localize your assets. Colors often have different meanings in different cultures, for example, yellow is associated with happiness in the UK but in China, it’s linked to pornography. That’s why it’s important not to rely exclusively on words, but also local expressions, cultural values, political or religious sensitivities, and market-specific content.
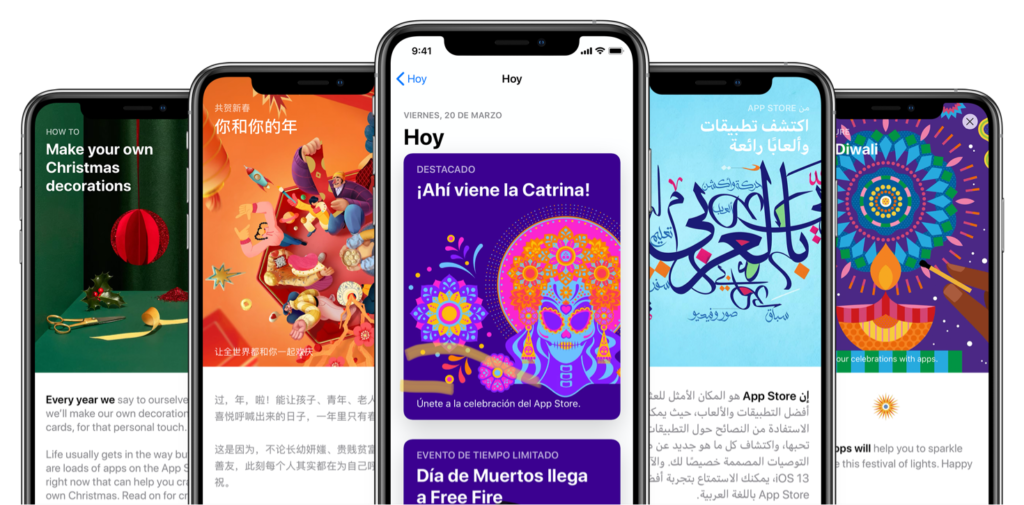
If you ever want to produce seasonal assets, to celebrate a particular event or holiday, keep in mind that not all countries celebrate the same event and that some events may be more prevalent than others in a specific region.
Why do you need to localize your creative assets?
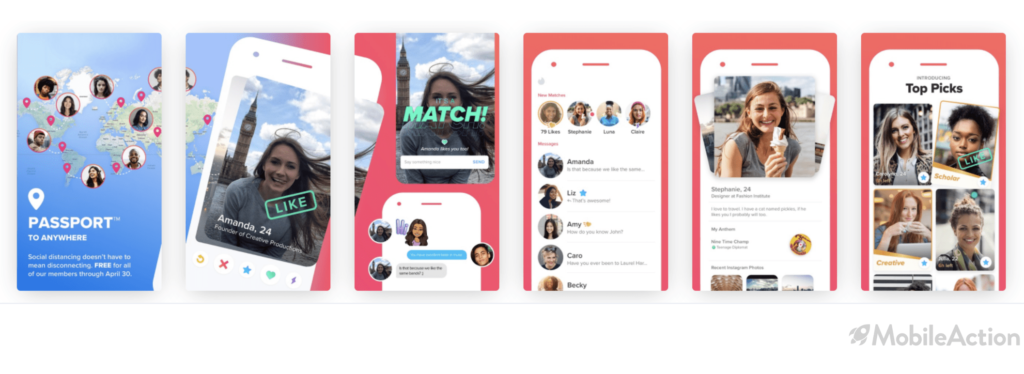
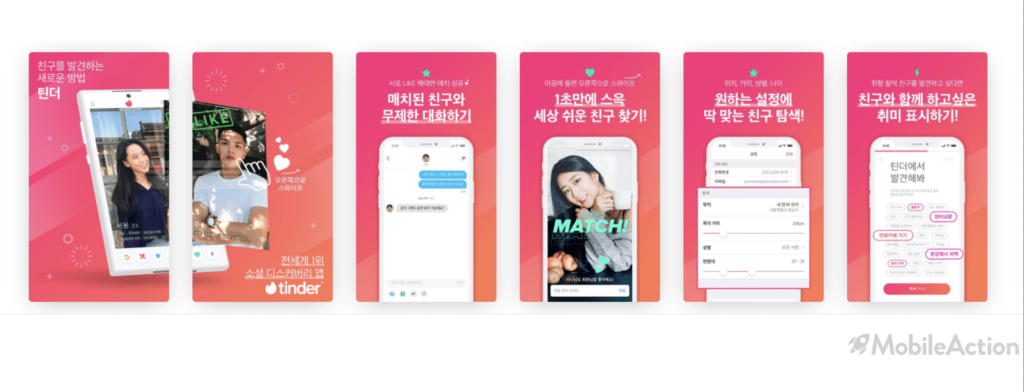
Localizing your app’s listing page isn’t just about translating the app title, subtitle, and description. Both the screenshots and the preview videos are essential tools to convince users to download your app. They’re a direct dive into everything your app can offer.
If only the description is translated, your potential users will encounter visuals they don’t understand, and they won’t be able to imagine themselves using the app. Or they will think that the app may not be translated in their native languages and that can impact your conversion rate.
In fact, a localized app store page can give your conversion rate up to a 26% lift!
Localization is an essential part of your app store optimization journey, you need to ensure that everyone feels welcome to use your app. Proper localization will guarantee that users won’t feel offended by a cultural misunderstanding and will be able to perfectly grasp all the information showcased on your listing page.
Do’s and Don’ts of localizing your creative assets
Now that you’ve decided you want to localize your creative assets, where do you start? We’ve got some tips to help you out:
- Research which locales and languages you should localize, every app is unique, and localizing could be a great way to finally reach that international audience that’s slipping through your fingers. Assess which market could be a great opportunity for your app, not every app encounters success in the same country. For example, in countries where your click-through rate might not be as high as expected, you can improve your reach thanks to localization!
- Work with native speakers, not only will they provide an accurate and relevant translation for your assets but they will also be able to guide you through other cultural elements (colors, local expressions, cultural habits,…). And for Play Store localization, don’t rely on their auto-translate feature, there may be mistakes.
- Test your localized creatives! Sometimes, you can’t get it right on the first try and that’s okay. Like everything in the mobile world, it takes a little trial and error before finding the perfect fit!
- Don’t just translate, incorporate cultural elements in your visuals. You’re a travel app? Change the image of your destinations. A food delivery app? Show local food on your screenshots.
- Even though your app icon should have a global appeal, when localizing consider infusing it with details that can help your brand better connect with your target audience. You could choose a different color to fit better while still remaining in your color scheme.
- Make sure that all the content of your listing page is localized! There’s nothing more frustrating than stumbling across a piece of information you can’t understand. Check thoroughly that all the texts, symbols (like currencies) and visuals are properly translated!
How to add localized assets on the App Store
To add localized screenshots and video previews you will need to follow these steps:
- Go into My Apps and select your app
- In the sidebar, click on the app version under the platform of your choice
- Go into the App Preview and Screenshots section, click on View All Sizes in the Media Manager
- In the upper-right corner, open the drop-down menu and choose the language
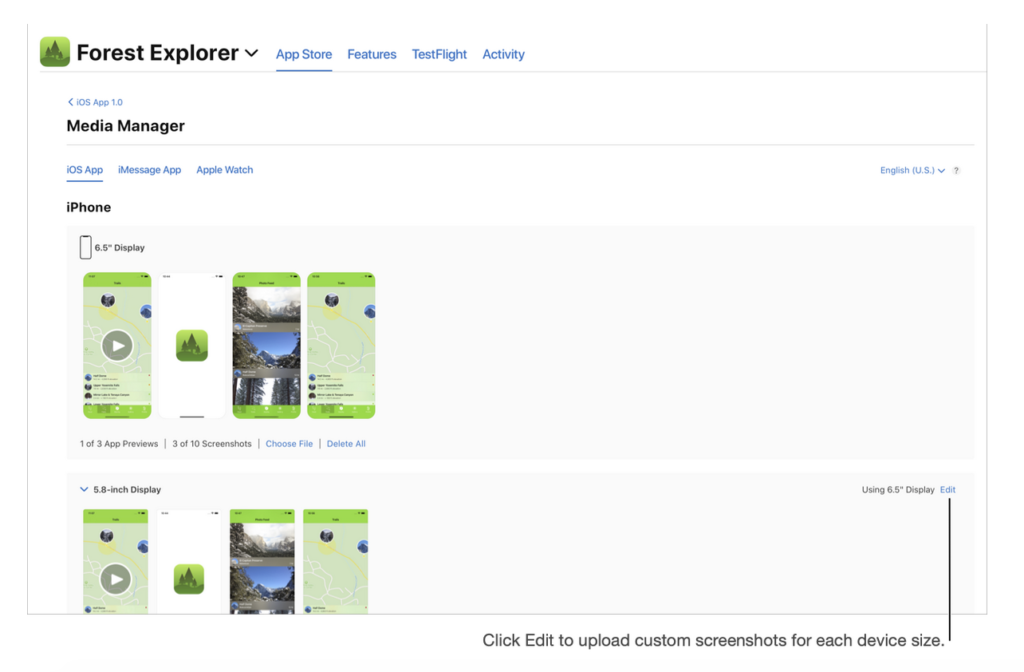
5. Click on Edit for the device size of your choice and upload your custom screenshots
6. Drag the localized screenshots and app previews to the corresponding device size
There you go, your App Store creatives are now localized!
Localizing on the Play Store
If you don’t add translations yourself on the Play Store, Google will use its translation tool to automatically translate all your listing page’s textual content. While that can help when your localized assets aren’t ready yet, it’s always better to add your own localization as to not rely on unchecked auto-translation that may not always be the most accurate.
There are two ways to localize a Play Store listing page: by language or by country (with custom listings).
To see all the ways to localize your Play Store listing page, check out our article on the subject right here.
If you want to localize by language, you need to follow these steps to add a language:
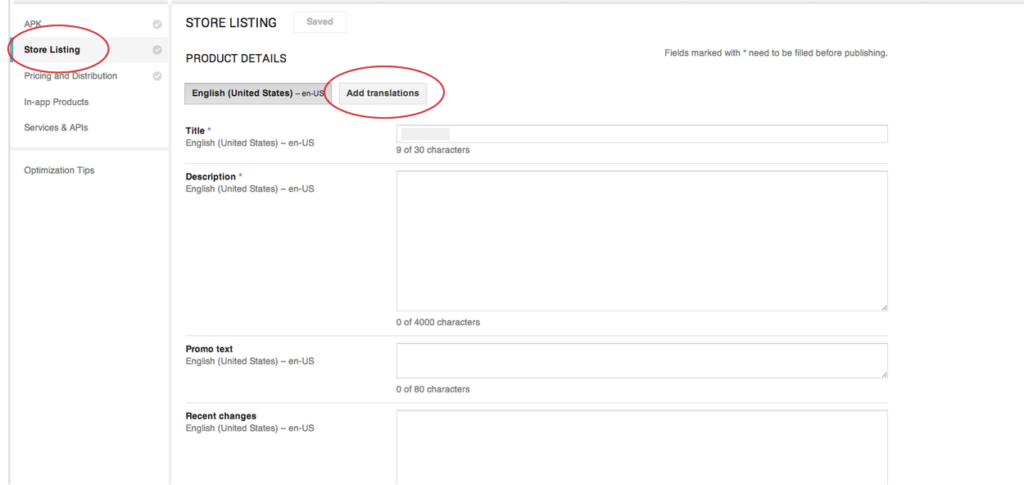
- Go to the main store listing in the Play Console (Grow > Store Presence > Main Store Listing)
- Click on Add translations at the top of the page, then select Add your own translation text (or manage translations/manage your own translation text if you’ve already added translations)
3. Under Add or remove languages select the language you’re interested in and click on Apply
4. Fill in the details and save the changes
If you’d rather use custom store listings, which will target users according to the country they’re in. You should be aware that even though you can target several countries with one custom listing, you can only create 5 of them.
To create a custom store listing, follow these steps:
- Select an app in the Play Console
- On the menu, select Grow > Store presence > Custom store listings (your app needs to be published with a main store listing before you can create custom ones)
- Select Create custom store listing
- Fill in the details (the name in Listing details will only be visible by you and not your users, however, it can’t be edited once it exists)
- Choose the targeting segments you’re aiming for: country and/or install state
- In the App details section, you need to choose a default language (Manage translations > change default language). You can also add translations for your custom listing, you just need to select Manage your own translations
- Fill in the app details (title, short and full description)
- Upload your graphic assets in the Graphics section
- Select Create
There you go!
You’re now ready to localize your creative assets! Do you have any more localizing tips to share? What is your localizing strategy going to be like? We have a team of experts ready to help you plan and localize your assets to get you global-ready!
- Mobile Video Monthly #38 – November 2023 - 5 December 2023
- Disturbing ads, a new trend for mobile gaming creatives? - 28 November 2023
- The Power of Holiday Marketing in Boosting Mobile Game Engagement - 21 November 2023
