7 Ways To A/B Test Your App Page Creatives
Mobile App Growth
July 25, 2017

This is a guest post by Josh Kocaurek from Appsposure.
If you could increase your app’s conversion rate by 66% by changing one graphic, would you do it? Of course you would!
By now, you know how important A/B testing is for your app.
For every 1% increase in conversion you achieve, you’ll be making 1% more money; it’s that simple.
The problem for most people is: how do you actually do it?
If you’re on Google Play, using Google Experiments is the obvious answer. But what if your app is only available for iOS? What if you want to run a test before launching?
In this post, I’ll show you a handful of ways to A/B test so you won’t have any excuse not to!
What should you be testing?
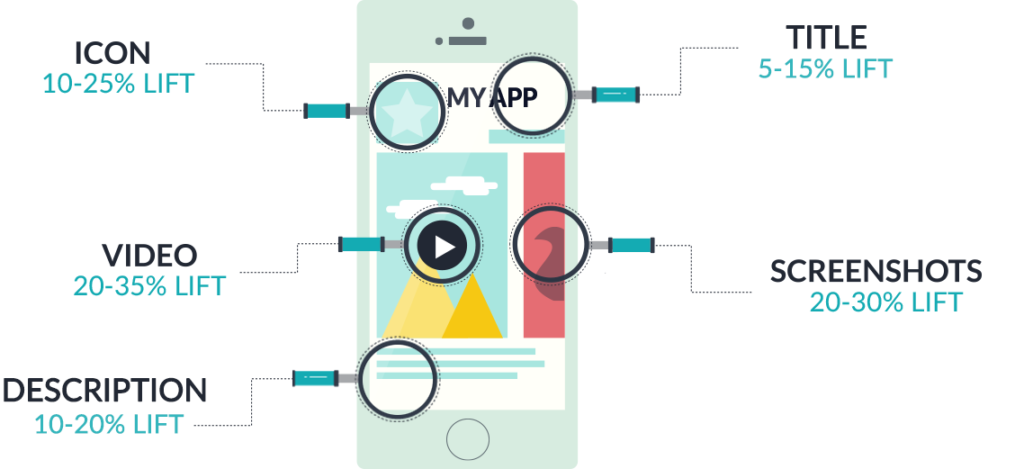
When deciding what to test, look for parts of your app page which are obviously neglected. For example, if you have a beautiful icon but your screenshots are weak, test out some new enhanced screenshots with captions and see what happens.
According to StoreMaven, these are the average increases in conversion for each element listed in order of importance:
Where do you check your current conversion rate?
If your app is in the Google Play Store, you can click under the “Acquisition Reports” tab to see the conversion data on organic downloads. Google Play is also kind enough to show benchmark data of how your app performs against other apps in the same category.
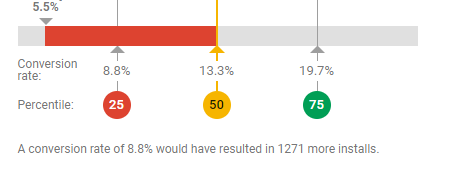
As you can see, If your app converts below the average app in your category, Google will tease you about how many downloads you’re missing.
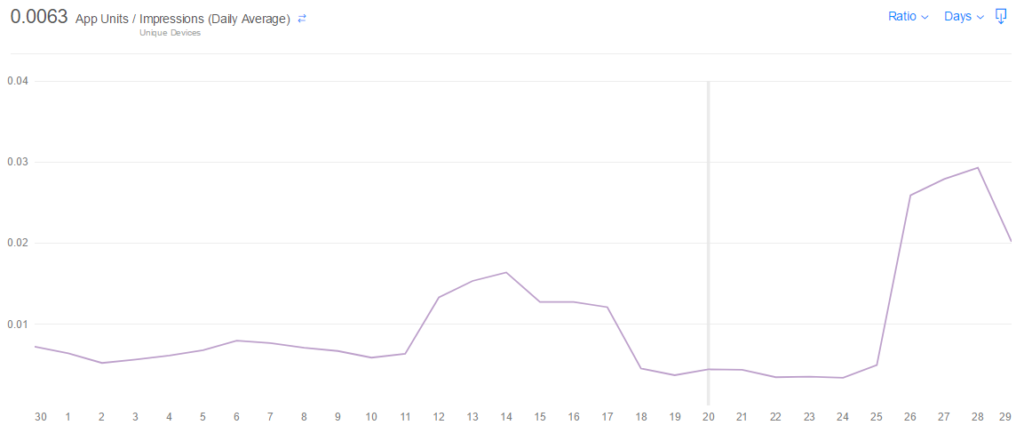
To check your conversion rate in the iOS store, open up the “Analytics” page and click “Conversion Rate”. Once this is selected, the chart will show your app’s conversion rate on a daily basis.
To make sure you’re only getting data from organic users in the iOS dashboard, setup a filter for either “App Store Browse” or “App Store Search” like so:
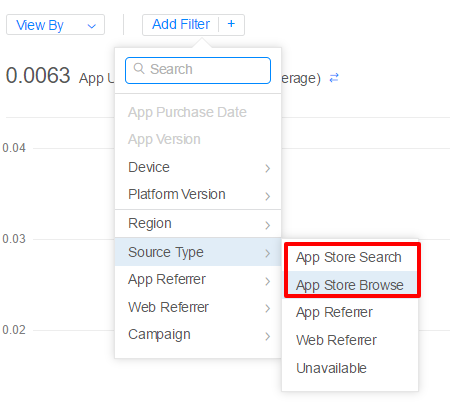
This will ensure that you’re only collecting data for users organically browsing the store.
1. Before and after testing
Hard to call this one A/B testing but it can still be useful to provide insights into which creatives perform better.
If you’re serious about improving your conversion (and you should be), I would advise against using only this method.
Pros:
Super easy to do
Just upload the new versions, wait a few weeks, then compare the conversion rate before and after.
It’s free
Cons:
Very inaccurate
Take a look at your conversion rates right now and you’ll see that they bounce around a lot.
Even when you’re not making any changes, your conversion rate can fluctuate by as much as 50% every month which can lead to incorrect assumptions.
No Pre-launch testing
You’ll need to have the app in the store to use this method.
Takes a long time
You’ll need to publish the app and give it time to gather enough data before making any conclusions.
When should you use this method?
You should consider this method if:
- Your app is only available on iOS
- You don’t have the budget for paid ads
- You don’t have a landing page for the website you can run tests on
- You’re absolutely sure the new variations will improve your conversion rate
2. Run Tests With Google Play Store Listing Experiments
If your app is in the Google Play store, this should be your go to method.
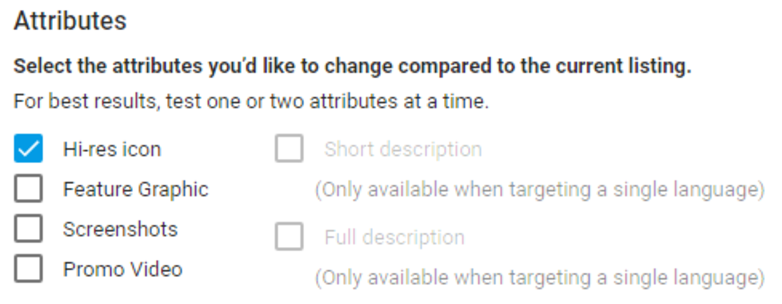
With Google experiments you can A/B test on things like your icon, description, feature graphics, screenshots, and promo video.
Setting up a Google Experiment is simple.
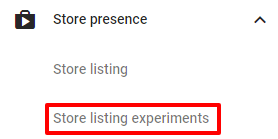
Open up the Google Play dashboard and click here:
There are two type of tests you can run:
- Global – Global tests will show to all users. These types of tests are good for assets that do not involve text (i.e. icons) since it will not isolate anyone who doesn’t speak the language.
- Localized – Localized tests will only show to users in the targeted language. With these, you can test things like description, videos, or screenshots by making sure the people who see these assets can actually speak the language.
Once you’ve decided what type of test to run, choose what you want to test and let it rip!
Once you have the test setup and running, it should look like this:
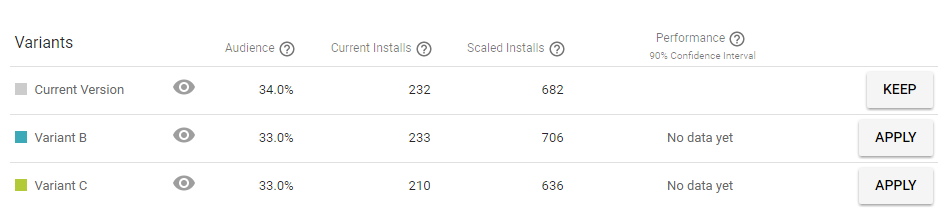
From there, all you have to do wait. When the test reaches a 90% level of confidence, the test will conclude and you’ll have your data. Here is Google’s documentation on how to run A/B tests on your store listing.
Pros:
Accurate
Since you’re running real A/B tests directly in the Google Play store, your results are going to be much more accurate. Granted, the statistical significance and “90% confidence interval” leaves room to some errors.
Easy to use
All you need to get started is an app in the store and some variations to test.
It’s Free
Cons:
Only for Google Play
Hopefully soon Apple will release their own A/B testing tool, but for now, all we can do is dream.
If you have an app in both Google Play and iOS stores, you can run a test with Google Play Store Listing Experiments then try to apply the best ones to the iOS store (but make sure you evaluate the impact).
No Pre-launch testing
To run an experiment, you’ll need the app published already. If you want to test your assets before launch, you’ll need to use another method.
When should you use this method?
You should consider this method if:
- Your app is available for Google Play
Google Experiments should be your go to testing method if your app is on Google Play.
Case studies
Check out these great case studies on Google Experiment success stories:
- EverythingMe Google Experiment case study
- Dashlane Google Experiment case study
- Aviary Google Experiment case study
- Kongregate, Dots & more Google Experiment case studies
3. Use third party testing software
If you’re app is only available for iOS and you have the budget for it, this should be your go to method of A/B testing.
With this method, you’ll use a third party service like SplitMetrics (my personal favorite), Storemaven, or Test Nest to set up mock app store pages. In my experience, they pretty much do the same thing with minor differences in the analytics reporting.
Once the page is setup, you then create several variations of it with different changes to test against each other.
For example, you can create two mock app pages, each with a different icon.
From there, you will drive traffic to the variations with Facebook Ads or any traffic source of your choosing to see which one converts the best.
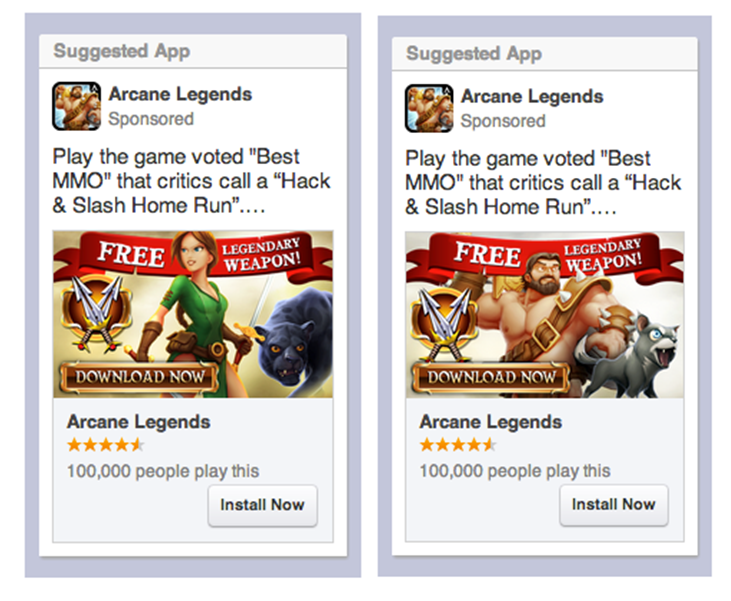
Here’s an example of a campaign we ran with Illusion Labs to test 3 different icon variations for during the soft launch of their new game BaconEscape using SplitMetrics.
![]()
As you can see, the version showing the pig on the train tracks converted the best which is what they ended up using.
To run the tests, Apptamin already has 2 wicked guides for this strategy, check them out:
- How to A/B test App Preview videos vs. Screenshots
- Double Your App Conversion Rate with App A/B Testing
Pros:
Allows for pre-launch testing
If you’re looking to test your graphical assets before launching, using third party software is a perfect way to do it. Once they click “install” on the mock app page, you can direct them to the landing page where you can collect their email.
The downside of this is it may upset some users who are excited to try it out since they’ll have to wait until launch.
Allows testing on more variables at once.
For example, you can test your screenshots in one test with paid ads, then icons in another campaign.
You can use attribution links to track user behaviour
If you’re using a service like AppsFlyer, you can use their links to track how users behave once they download the app.
This is important because different variations may attract users who behave differently and spend more money.
For example, perhaps variation A converts 10% better than variation B but AppsFlyer shows that users who saw variation B spend 20% more money. Which variation would you choose? Variation B of course!
Cons:
Expensive
Not only can paid ads cost a lot, the softwares needed to run the tests start their pricing at $149/month (TestNest) and quickly goes up from there.
Not all clicks on third party store page will convert in the app store
When a user clicks “install” on the mock app page, they will be taken to the real app page where they will have to click it again. During this process, a handful of users will drop off, meaning that you’ll end up paying more for ads running to a mock app page than you would normally.
When should you use this method?
You should consider this method if:
- Your app is only available on iOS
- You want to do pre-launch A/B testing
- You can afford to buy the testing softwares and run a paid ads campaign along
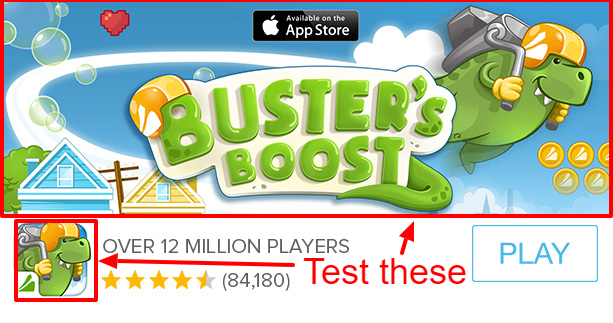
4. A/B test directly in paid ad creatives
With this strategy, you’ll be using paid ads like Facebook Ads or any ad network of your choosing to A/B test your creatives.
How it works for Facebook is you run Facebook Ads showing off your different creatives.
This works a lot like using third party software mentioned above except instead of driving traffic to a mock app page, you’ll be using Facebook Ads directly to test your creatives.
It looks something like this:
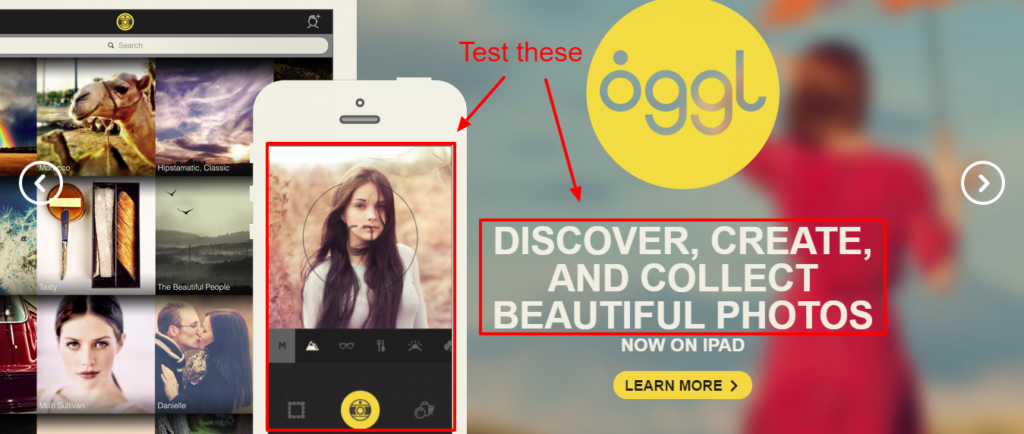
For other ad networks besides Facebook, you can test your icon, description or screenshots within the ads.
For example, if you were to use Chartboost, you could test these:
Here is an additional link from Chartboost: Boost Your Mobile Advertising Conversion by up to 15% in One Click with Social Metadata
Pros:
Cheaper than with third party software
Since you won’t need to include any of the third party software, all you’ll need to pay for is the ads.
Can pre-launch test different assets
With a Facebook campaign, you can test different creative before launching the app.
Can test multiple variables at once
For example, you can test screenshots in one campaign and icons in another all at the same time.
Cons:
Can give skewed results
Although this method will give you a good idea of what converts the best, the data will not be as accurate compared to using a real or mock app page. This is because the ads will no look the same as an app store page so users won’t see the graphics in the same context as they would on the app store.
Still can be expensive
Although it will be cheaper than using a mock app page, it can still cost a fair bit to drive enough clicks on the ad.
When should you use this method?
You should consider this method if:
- Your app is only available on iOS
- You want to do pre-launch A/B testing
- You can afford to run a paid ads campaign but not the testing software such as Split Metrics
5. A/B test directly on your landing page
If you have a separate landing page for your app (which you should have if you followed my 14 app launch tips infographic), you can use it to A/B test different graphics.
For example, you can use a service like Optimizely or Google Optimize to run tests on icons, screenshots, descriptions, title, or even your pricing directly on your landing page.
Shoutout to Sujan Pate for this one.
Check out this Kissmetrics Guide for more details on how to pull this off.
Pros
Can be done in pre-launch
All you really need is simple email collection landing page to test variations.
Can be cheap and easy
If you have a site already set up that’s getting decent traffic, all you need to do is instal an A/B testing tool and run the tests.
Cons
Not as accurate as app store page
Since the context on your site will be different than on the actual app store page, the results may be skewed.
Can be pricey and time consuming
If you don’t have a site already made, it can take some time to get one set up. Also, you’ll enough traffic to make the tests happen so you may need to run paid ads to the site.
When should you use this method?
You should consider this method if:
- Your app is only available on iOS
You want to do pre-launch A/B testing
You have a landing page already available with enough traffic you can run A/B tests on
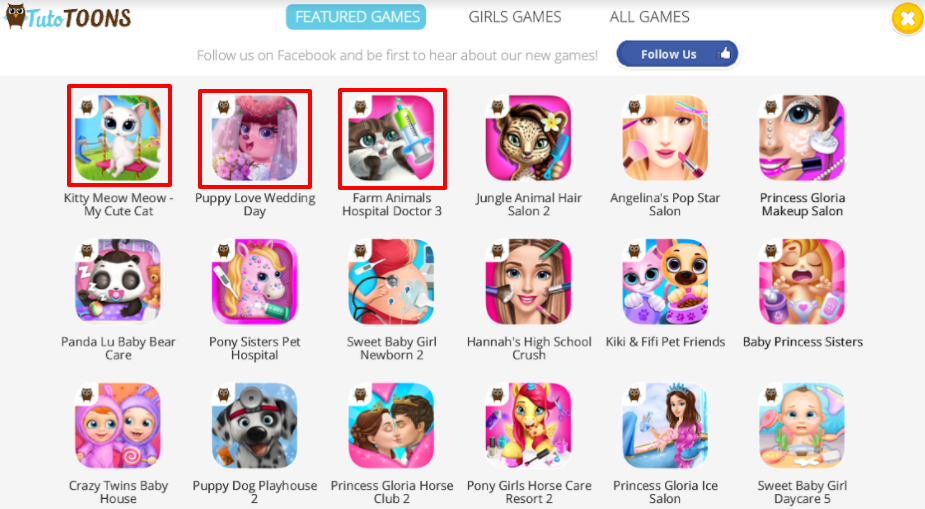
6. In-app offer walls
This one will only work if you have other apps you can use to cross promote with.
How it works is you would set up an app offer wall in another app you own to cross promote the app you want to test on. From there, you will A/B test this icon using a service like Apptimize or Optimizely.
Here’s what the offer wall you would A/B test icons on would look like:
Pros
Can be cheap
Once you get your offer wall setup with different icons, all the current users of your game will be your A/B tester for free!
Cons
Not as accurate as app store page
Since the context on your site will be different than on the actual app store page, the results may be skewed.
Can be time consuming
It can take a while to get the offer wall set up along with the A/B tests.
You need at least one other app that’s already successful
Since you’ll be using another app’s existing user base to A/B test, you’ll need to actually have another app with an existing user base.
When should you use this method?
You should consider this method if:
- You have a large base of similar apps you can cross promote between
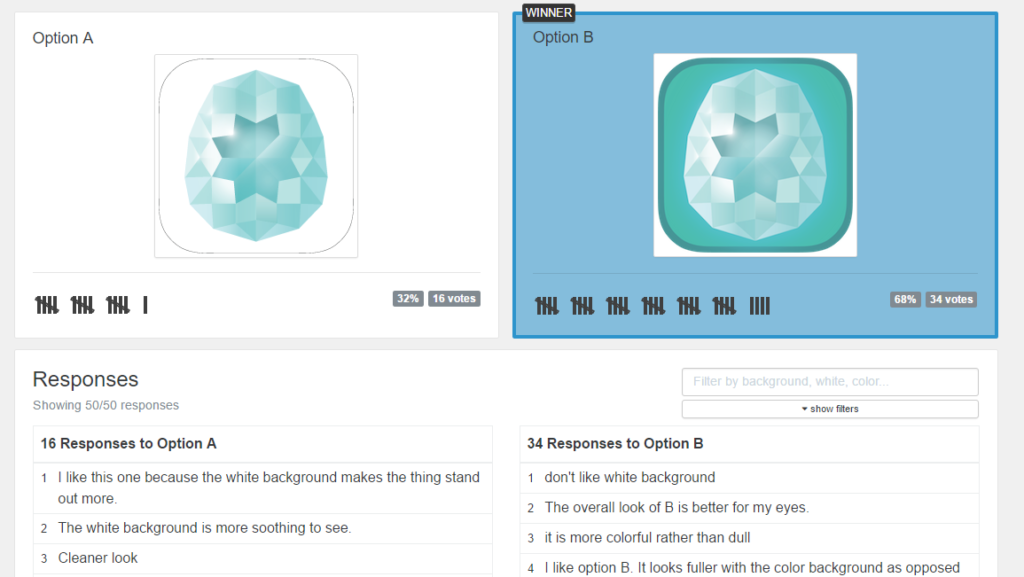
7. Run an A/B testing poll
With this technique, you’ll share your graphics with a closed group of people and ask them to vote for their favorite one.
Here’s what it looks like in a Facebook group (shoutout to Steve Young):
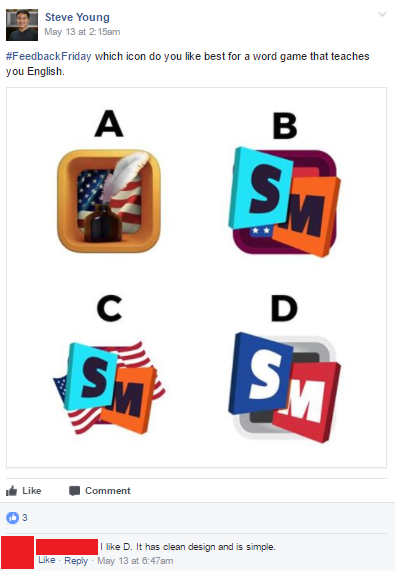
You can run tests like these in places like Facebook groups, Subreddits, or even by showing variations to friends and family. Here are some links:
Another great paid option is to run a poll with a service like Pickfu comparing two variations. You can get 50 responses on your poll for only $20
Pros
Cheap and easy
All you have to do is post your poll to a group of people and ask their opinion. Even with a paid poll you can get results fairly cheaply.
You can get direct feedback
Since you’ll be interacting with people more directly, you can have them give feedback on what they like and didn’t like.
Allows for pre-launch testing
Cons
Inaccurate
Having people pick which one they like better is much different than having people about to download the app decide. Often times, they may just pick the most pretty or flashy icon, not the one that actually converts the best.
When should you use this method?
You should consider this method if:
- Your app is only available on iOS
- You would like to get some real qualitative feedback with the tests which you can use to tweak the designs
Conclusion
So there you have it. You now have no reason not to be A/B testing no matter what platform your on.
One final piece of advice is that you can start your testing with a qualitative method (like running a poll) to point you in the right direction.
For example, let’s say your app is not yet launched and you’re deciding on what colors to use in your icon and screenshots. What you can do is run a poll using several different color palettes, collect feedback on each one, then use that data going forward to make better designs.
Have you done any A/B testing for your app? Tell us about it in the comments below! We’d love to hear how it worked out for you.
About the author
Josh Kocaurek (ko-sore-ick) is the Toronto born founder of Appsposure – a marketing agency specializing in getting apps more downloads using ASO, conversion optimization, paid ads, and PR. He’s worked with publishers ranging from indie devs to studios with 100 million+ downloads to help get their apps as many installs as possible. Click here to read his latest post where he shows you how to get more downloads with over 100 different app marketing strategies.
- Engage, Retain, Earn: Growth Strategy for Game Apps [Based on Data] - 15 September 2022
- How to do App Store Optimization step-by-step: a full cycle of ASO in the App Store and Google Play - 9 August 2022
- The Importance of A/B Testing - 13 January 2022

There is definately a lot to find out about this
topic. I like all the points you’ve made.